

Java Development Kit (JDK) 1.7 (officially named Java SE 7), which is freely available from Sun Microsystems (now part of Oracle), is needed for writing Java programs. JDK can be downloaded from the Java mother site @ http://java.sun.com (or http://www.oracle.com/technetwork/java/index.html).
JDK or JRE?
JRE (Java Runtime) is needed for running Java programs. JDK (Java Development Kit), which includes JRE plus the development tools (such as compiler and debugger), is need for writing Java programs. Since you are supposed to write Java Programs, you should install JDK, which includes JRE.JDK Versions
The various JDK versions are:- JDK Alpha and Beta (1995): Sun announced Java in September 23, 1995.
- JDK 1.0 (January 23, 1996): Originally called Oak (named after the oak tree outside James Gosling's office). Renamed to Java 1 in JDK 1.0.2.
- JDK 1.1 (February 19, 1997): Introduced AWT event model, inner class, JavaBean, JDBC, and RMI.
- J2SE 1.2 (codename Playground) (December 8, 1998): Rebranded as "Java 2" and renamed JDK to J2SE (Java 2 Standard Edition). Also released J2EE (Java 2 Enterprise Edition) and J2ME (Java 2 Micro Edition). Included JFC (Java Foundation Classes - Swing, Accessibility API, Java 2D, Pluggable Look and Feel and Drag and Drop). Introduced Collection Framework and JIT compiler.
- J2SE 1.3 (codename Kestrel) (May 8, 2000): Introduced Hotspot JVM.
- J2SE 1.4 (codename Merlin) (February 6, 2002): Introduced assert, non-blocking IO (nio), logging API, image IO, Java webstart, regular expression support.
- J2SE 5.0 (codename Tiger) (September 30, 2004): Officially called 5.0 instead of 1.5. Introduced generics, autoboxing/unboxing, annotation, enum, varargs, for-each loop, static import.
- Java SE 6 (codename Mustang) (December 11, 2006): Renamed J2SE to Java SE (Java Standard Edition).
- Java SE 7 (codename Dolphin) (July 28, 2011): First version after Oracle purchased Sun (called Orcale JDK).
- Java SE 8: expected in summer 2013.
1. How To Install JDK (on Windows)
Step 0(a): Un-Install Older Version(s) of JDK/JRE
I always recommend to install the latest JDK, but it can be messy if you have multiple versions of JDK/JRE.If you have previously installed older version(s) of JDK/JRE, un-install ALL of them. Run "Control Panel" ⇒ Program and Features ⇒ Un-install programs begin with "Java", such as "Java SE Development Kit" and "Java SE Runtime". If you are not sure whether you have older version(s) of JDK, check!
Step 0(b): Understand Windows' CMD Shell
Step 1: Download JDK
- Goto Java SE download site @ http://www.oracle.com/technetwork/java/javase/downloads/index.html.
- Click the "Download" button under "JDK" of "Java SE 7".
- Choose your operating platform, e.g., Windows x86 for 32-bit Windows OS or Windows x64 for 64-bit Windows OS - You can check whether your OS is 32-bit or 64-bit via "Control Panel" ⇒ System ⇒ Under the "System Type".
Step 2: Install JDK and JRE
Run the downloaded installer (e.g., "jdk-7uxx-windows-i586.exe"), which installs both the JDK (Java Development Kit) and JRE (Java Runtime). By default, the JDK will be installed in directory "C:\Program Files\java\jdk1.7.0_{xx}", where {xx} denotes the latest upgrade number; and JRE in "C:\Program Files\java\jre7".For novices, accept the defaults. Simply click "next"..."next"... to install JDK in "
C:\Program Files\java\jdk1.7.0_{xx}" and JRE in "C:\Program Files\java\jre7". Take note of you JDK installed directory. I shall refer to the JDK installed directory as <JAVA_HOME>, hereafter, in this article.
(For Advanced Users Only) The default JDK/JRE directories work but I recommend avoiding "
Program Files" directory because of that blank character in the directory name. You may change the installed directories for JDK and JRE during installation. I personally installed JDK and all my programming tools in "d:\bin" (instead of "C:\Program Files") for ease of maintenance.Step 3: Include JDK's "bin" Directory in the PATH
Windows OS searches the current directory and the directories listed in thePATH environment variable for executable programs. JDK's programs (such as Java compiler javac.exe and Java runtime java.exe) reside in directory "<JAVA_HOME>\bin" (where <JAVA_HOME> denotes the JDK installed directory, e.g., C:\Program Files\java\jdk1.7.0_{xx}). You need to include the "<JAVA_HOME>\bin" directory in the PATH.To edit the
PATH environment variable in Windows 2000/XP/Vista/7:- "Start" button ⇒ "Control Panel" ⇒ "System" ⇒ (Vista/7 only) "Advanced system settings".
- Switch to "Advanced" tab ⇒ "Environment Variables..."
- In "System Variables" box, scroll down to select "
PATH" ⇒ "Edit..." - (Caution: Read thru the paragraph carefully before performing this step!) In "Variable value" field, INSERT "
c:\Program Files\java\jdk1.7.0_{xx}\bin" (VERIFY that this is your JDK's binary directory) IN FRONT of all the existing directories, followed by a semi-colon (;) which separates the JDK's binary directory from the rest of the existing directories. DO NOT DELETE any existing entries; otherwise, some existing applications may not run.Variable name : PATH Variable value : c:\Program Files\java\jdk1.7.0_{xx}\bin;....exiting entries....
(For Advanced Users Only)
I suggested that you place the JDK bin directory in front of "
You could read "Java Applications and Environment Variable" for more discussions about
I also recommend that you define an environment variable called
I suggested that you place the JDK bin directory in front of "
c:\windows\system32" and "c:\windows". This is because some Windows systems may have an out-dated copy of JDK/JRE in these directories. Do a search for "java.exe", and you will be amazed of the findings.You could read "Java Applications and Environment Variable" for more discussions about
PATH environment variable.I also recommend that you define an environment variable called
JAVA_HOME, which contains the JDK installed directory, and include the JDK bin directory in the PATH via JAVA_HOME, i.e., PATH=%JAVA_HOME%\bin;.....Step 4: Verify the JDK Installation
Launch aCMD shell ("Start" button ⇒ run... ⇒ enter "cmd"; or "Start" button ⇒ All Programs ⇒ Accessories ⇒ Command Prompt).- Issue a "
path" command to list the content of thePATHenvironment variable. Check the output and make sure that<JAVA_HOME>\binis listed in thePATH.prompt> path PATH=c:\Program Files\java\jdk1.7.0_{xx}\bin;......other entries...... - Issue the following commands to verify that JDK is properly installed and display its version:
prompt> java -version
java version "1.7.0_{xx}"
Java(TM) SE Runtime Environment (build 1.7.0_{xx}-b11)
Java HotSpot(TM) Client VM (build 23.3-b01, mixed mode, sharing)

prompt> javac -version
javac 1.7.0_{xx}
Step 5: Write a Hello-World Java Program
- Create a directory to keep all your works, e.g.,
d:\myproject, or any directory of your choice. Do NOT save your works in "Desktop" or "My Documents" as they are hard to locate. The directory name shall not contain blank or special characters. Use meaningful but short name as it is easier to type. - Launch a programming text editor (such as TextPad or NotePad++ or NotePad if you have no better choice). Begin with a new file and enter the following source code. Save the file as "
Hello.java", under your work directory (e.g.,d:\myproject)./* * First Java program to say Hello */ public class Hello { // saved as "Hello.java" under "d:\myproject" public static void main(String[] args) { System.out.println("Hello, world!"); } }
Step 6: Compile and Run the Hello-World Java Program
- To compile the source code "
Hello.java":- Start a CMD Shell ("Start" button ⇒ Select "run..." ⇒ Enter "
cmd"; or "Start" button ⇒ All Programs ⇒ Accessories ⇒ Command Prompt). - Set the Current Drive to the drive where you saved your source file "
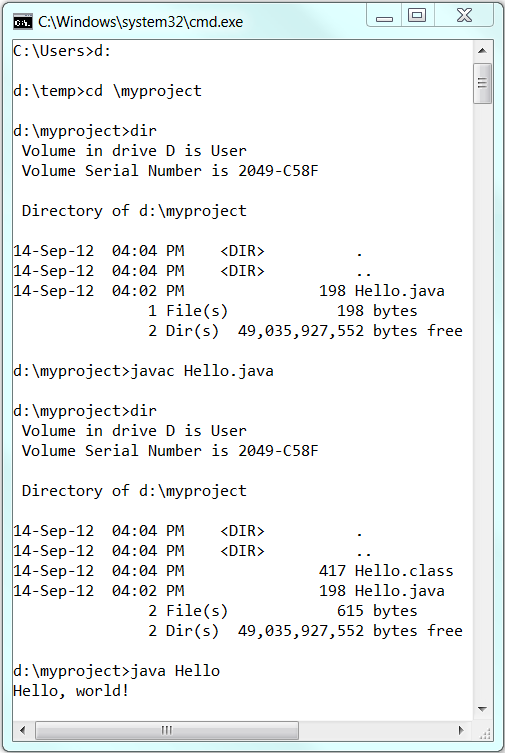
Hello.java". For example, suppose that your source file is saved in drive "d", enter "d:" as follow:prompt> d: D:\xxx>
- Set the Current Working Directory to the directory that you saved your source file via the
cd(Change Directory) command. For example, suppose that your source file is saved in directory "d:\myproject".D:\xxx> cd \myproject D:\myproject>
- Issue a
dir(List Directory) command to confirm that your source file is present in the current directory.D:\myproject> dir ...... 08-May-XX 06:25 PM 277 Hello.java ......
- Invoke the JDK compiler "
javac" to compile the source code "Hello.java".D:\myproject> javac Hello.java
The compilation is successful if the command prompt returns. Otherwise, error messages would be shown. Correct the errors in your source file and re-compile. if you encounter problems compiling your program. - The output of the compilation is a Java class called "
Hello.class". Issue adir(List Directory) command again to check for the output.D:\myproject> dir ...... 03-Jul-xx 01:53 PM 416 Hello.class 08-May-xx 06:25 PM 277 Hello.java ......
- Start a CMD Shell ("Start" button ⇒ Select "run..." ⇒ Enter "
- To run the program, invoke the Java Runtime "
java":D:\myproject> java Hello Hello, world!
Step 7: (Optional) Download JDK API Documentation, Samples and Demos
The JDK download does not include the documentation, which needs to be downloaded separately. In the past, I always insist that my students should have a local copy of JDK API Documentation. But, today, you can easily access the online copy by googling "JDK 7 Documentation".To install JDK API documentation:
- From the Java SE download page (@ http://www.oracle.com/technetwork/java/javase/downloads/index.html), look for "Java SE 7 Documentation" (under "Additional Resources") ⇒ Download the zip-file (e.g., "
jdk-7....zip" - about 57MB). - Unzip into the
<JAVA_HOME>(JDK installed directory). The documentation will be unzipped into "<$JAVA_HOME>\docs". Browse the JDK documentation by opening "<JAVA_HOME>\docs\index.html".
Step 8: (For Advanced Users Only) JDK's Source Code
Source code for JDK is provided and kept in "<JAVA_HOME>\src.zip". I strongly recommend that you to go through some of the source files such as "String.java", "Math.java", and "Integer.java", under "java\lang".4. (Advanced) External JAR Files and Native Libraries
External Java packages (such as Servlet, MySQL Connector/J, JOGL, JUnit) are often distributed in JAR files (Java Archive - a single-file package of many Java classes), with possibly Native Libraries (".lib" and ".dll" in Windows, or ".a" and ".so" in Linux/Mac).External JAR Files (".jar")
If external JAR files are not properly included:- During the compilation, you will receive compilation error "cannot find symbol" on classes belonging to the external packages.
- During executation, you will get a runtime error "Error: Could not find or load main class xxx",
- Copy all the JAR files of the external packages to the JDK's Extension Directories.
- For Windows, the JDK extension directory is located at "
<JAVA_HOME>\jre\lib\ext" (e.g., "c:\Program Files\java\jdk1.7.0_{xx}\jre\lib\ext"). - For Mac, the JDK extension directories are "
/Library/Java/Extensions" and "/System/Library/Java/Extensions". - For Ubuntu, the JDK extension directories are "
<JAVA_HOME>/jre/lib/ext" (e.g., "/usr/lib/jvm/jdk1.7.0_{xx}/jre/lib/ext") and "/usr/java/packages/lib/ext".
java.ext.dirs". You can print its contents viaSystem.out.println(System.getProperty("java.ext.dirs")). - For Windows, the JDK extension directory is located at "
- You can include all the JAR files in the
CLASSPATHenvironment variable. TheCLASSPATHmay contain directories (containing Java classes) or JAR files (single-file archive of Java classes). If you set theCLASSPATH, you must also include the current directory (denoted as ".").- For Windows, set the
CLASSPATHin Control Panel ⇒ System ⇒ Advanced system settings ⇒ Advanced ⇒ Environment Variables ⇒ System Variables ⇒ New ⇒ In "Variable name", enter "CLASSPATH" ⇒ In "Variable value", enter ".;path1\xxx.jar;path2\yyy.jar", where the entries are separated by a semi-colon (;). - For Linux and Mac OS: Edit
~/.profileor~/.bash_profileto include the following line at the end of the file:export CLASSPATH=.:path1/xxx.jar:path2/yyy.jar
The entries are seperated by colon (:).
- For Windows, set the
- You can also set the
CLASSPATHin thejavac/java's command-line via the option-cp <paths>(or-classpath <paths>), for example,// Compile Java source code > javac -cp .:path1/xxx.jar:path2/yyy.jar ClassName.java // Run Java class > java -cp .:path1/xxx.jar:path2/yyy.jar ClassName
External Native Libraries (".lib", ".dll", ".a", ".so")
Some external package may provide static or shared native libraries in the form of ".lib" (Windows' static library), ".dll" (Windows' dynamically link library), ".a" (Unix's static library), or ".so" (Unix's shared library).Native Libraries are to be kept in a directory accessible via JRE's Property "
java.library.path", which normally but not necessarily includes all the directories from the PATH environment variable.Native libraries are not involved in the compilation. But if they are not properly included during runtime time, you will get a runtime error "
java.lang.UnsatisfiedLinkError: no xxx in java.library.path".To include external native libraries:
- Copy the native libraries into a system library directory, e.g.,
c:\windows\system32(Windows),/usr/libor/usr/local/lib(Linux or Mac OS). You can verify that the directory is included in System Property "java.library.path", viaSystem.out.println(System.getProperty("java.library.path")). - You can also set the native library path via the
java's command-line option-Djava.library.path=xxx, for example,> java -Djava.library.path=xxx ClassName
No comments:
Post a Comment
We are Happy to help you so we are given reply as soon as possible.
Thank You.